Showing posts with label aerodynamics. Show all posts

Friday, May 11, 2018

Conquering the Andean


Recently, I posted a couple of teaser pics of a bike on Facebook.  I get the opportunity to work on some fun projects in the studio, and today's project is a brand new Diamondback Andean custom-ordered on behalf of a customer.  Aside from being a really interesting bike, the reason I wanted to write about this is because of the packaging: Diamondback is making some waves in the industry with their approach to direct-to-consumer bike delivery, which involved rethinking and retooling their shipping department to allow a consumer to receive a bike that's basically ready to ride.  Let's take a look at how they are doing things differently and if this is something that the end customer can comfortably assemble and ride safely.

I've had the opportunity to assemble a lot of bikes when I worked part-time at LoKe Bicycles in Fishers for a few months in 2016.  Bikes destined for the bike shop arrive in a similar state of assembly - the box is as compact as it can be, the bike is well-padded and there is quite a bit of assembly to be done.  I am certainly not the fastest mechanic, but most bikes took anywhere from 45 minutes to an hour and a half to assemble.  LoKe has a really solid process documented for the assembly of every bike, from the tiniest of kids' bikes to the high end racing machines.  The process includes truing the wheels, ensuring the brakes and drivetrain are all working perfectly, cleaning and polishing everything, and ensuring everything is tightened and torqued to spec before it's put on the floor or delivered to a happy owner.

Diamondback wants to change that process (well, not the happy owner part) with a direct-to-consumer model, essentially eliminating the local bike shop.  For the bike shops, this doesn't sound like good news, but this is the way of our world now.  Good or bad, this is an option for consumers.  I'm all about consumer options, so let's look at this one.

This bike was for a customer, who we'll call Roger Shrubber.  Roger came to me for a MATCH bike sizing, where we discussed his goals and ideas for a bike, we sized him up using the F.I.S.T. protocol, and came up with a list of bike solutions that fit him along with his measurements.  In my opinion, this is the only way to buy a bike - find your happy place in space and put the right bike underneath you.  Roger's list included quite a few options, and he had been particularly intrigued by the Andean.  With his fit information in hand, he went to the Diamondback Custom Studio website and built his Andean the way he wanted it, even down to using the same aerobar extensions and saddle that he was sized up on.  There was one small hitch in the plan - we sized him up for 165mm cranks, but they were in short supply.  After a bit of discussion with the folks at Diamondback, we convinced them to allow us to install a crankset from a different source, making a rare exception of not delivering a complete bike.  So, what you see here is a bit of an anomaly, and it was nice that Diamondback trusted us to finish the bike.  With that, the bike was on it's way, shipped directly to me so I can have it ready to go when Roger comes in for his fit.

I picked the bike up at the local FedEx store.  The first thing that the guy behind the counter said to me was, "dude, your package is huge - let me get you a cart."  He wasn't kidding.  The box measures approximately 45" long, 37" tall, and 21" wide.  It's a bit cumbersome, so thank you Mr. FedEx guy for loaning me a cart.


Once the bike was at the studio, it was time to start the unboxing process.  The top has three tabs, and 4 layers of cardboard.  Opening the top exposes the bike, and the first thing you notice is that the handlebars are completely installed, which is part of why the box is so wide.  The aerobar extensions are detached, and packaged vertically right in front of the head tube.  Roger opted for HED wheels, which are packaged on either side of the frame.  An unmarked box sits on top of the back part of the frame and the seatpost sticking out of the bottom of it suggests what is inside.


Opening the box, we find the User Guide and Owner's Manual.  The Owner's Manual is your typical generic bicycle Owner's Manual, with a bunch of generic instructions on how you should probably wear a helmet, have air in your tires, etc.  It does come in a nice little sleeve with a magnetic latch.  The User Guide is a bit more useful - it includes instructions on how to unbox and assemble your Andean.  It probably would make sense to put a label on this box saying "Hey, open me first - the instructions are inside here."


Digging a bit more into the box, we find the saddle is installed on the seatpost, the bottle cage, and a few other parts and accessories, including a full set of spacers and bolts for the aerobars, which are the Profile Design Aeria, in this case.  Also, because of our special order, the Shimano chain was in here in the original packaging.


Following the instructions in the User Guide, we remove the velcro straps securing the base bar and wheels.  I pulled the wheels out first, the rest of the cardboard pieces, and finally the frame.  Tucked away near the front of the bike were the Profile Design accessories Roger ordered.


At this point, I'm ready to put the bike together and would like to put it in the bike stand.  The problem is that I can't find the seatpost binder clamp.  Digging around, I'm starting to panic a bit when I realize the unmarked box has a secret compartment, with a whole pile of more goodies, including the seatpost binder clamp.  Crisis averted.  We hit the jackpot - along with the binder clamp, we've got the Di2 charger and plug tool, a torque wrench, thru-axles, an extra rear derailleur hanger, and a bunch of other stuff.  The good news is we've got lots of stuff!
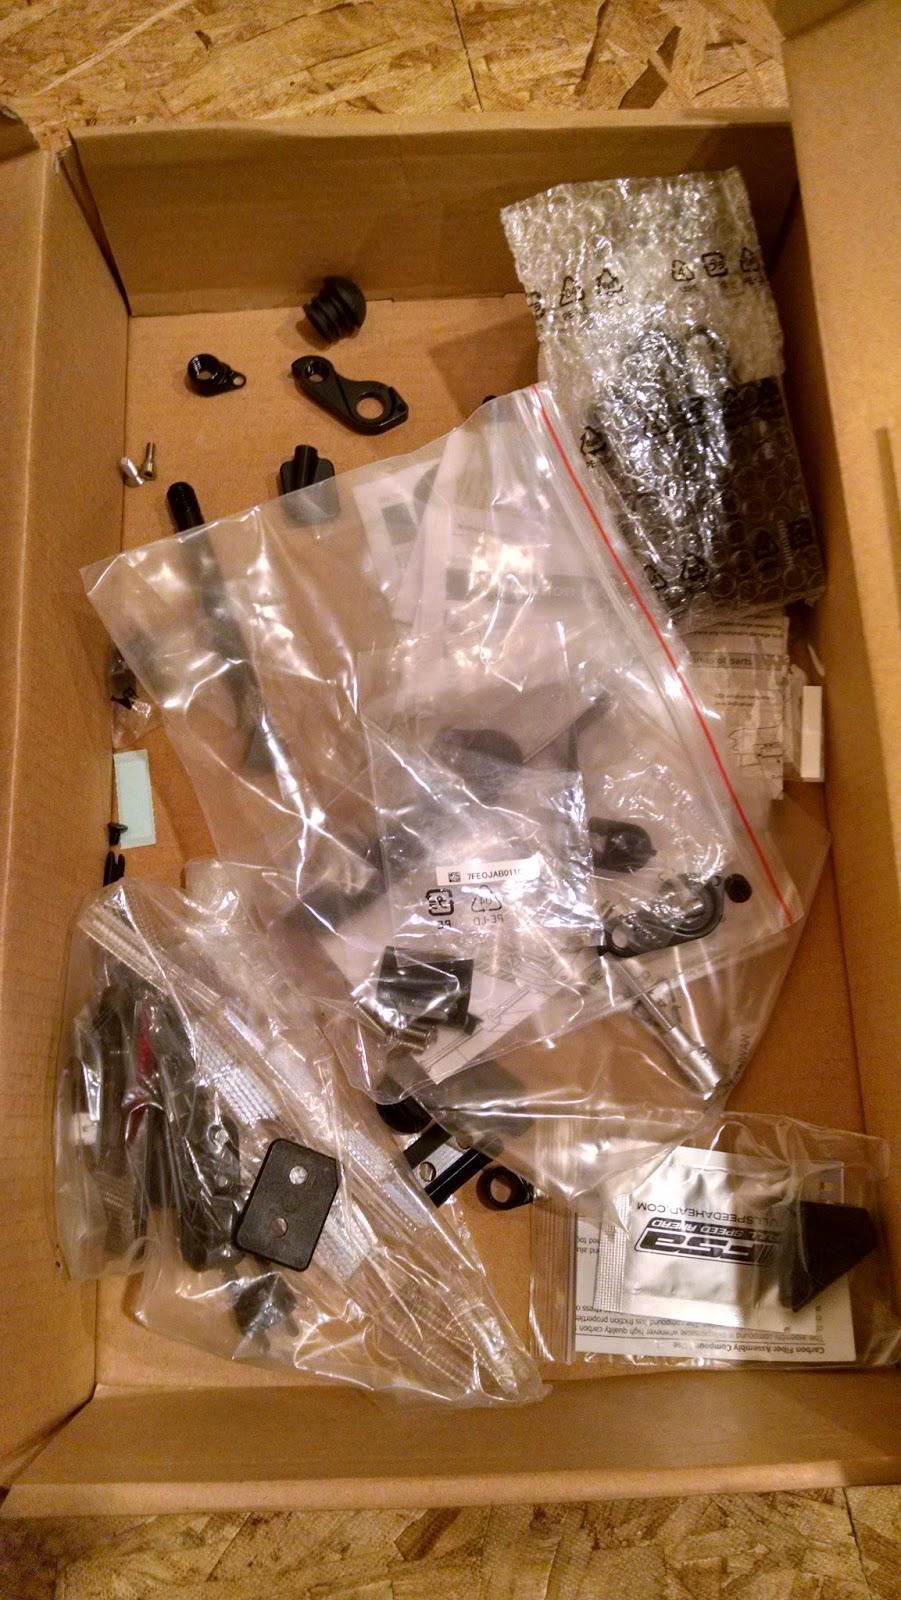


The bad news?  Umm, we've got lots of stuff!  This is starting to look like a bike that the average consumer might not be able to assemble.  I get the impression this would be pretty intimidating for a new owner thinking they're going to get a bike that's almost ready to ride.

Nonetheless, we continue.  After installing the binder clamp, I put the bike in the stand for assembly.  Removing the last bit of packaging, I realize that when they describe the packaging that protects the rear part of the frame as a foam roller, they actually are including a real foam roller!  A quick look inside the box again, and the piece of foam that was used to protect the bottom of the fork is a pull buoy.  Way too fun - what a neat idea!


Since this bike was a special order without a crankset installed, the installation process was a bit more complex than what most folks will be faced with.  Basically, when you get this bike, you have the following to do:

1.  Install the seat post in the seat tube.
2.  Put the wheels on.
3.  Install the aerobar extensions.
4.  Install optional accessories.

Most of these steps are things a triathlete or cyclist will have to figure out eventually, but may not be comfortable doing themselves.  It seems like a lot at first, but Diamondback does a pretty good job of making it all as easy as it can be - the instructions are good, they provide things like carbon paste for the seat tube, etc., and also include a torque wrench so you can get it right.  It is nice to have a work stand and all the tools, but you could get by without.


For this specific bike, aside from the crankset installation, there were a couple of changes we ended up making.  When the bike arrived, Diamondback had set the pad stack and reach to be pretty close to what we had indicated online.  In this case, because Roger had selected the Profile Design Aeria cockpit, we had the ability to set it up a bit differently than Diamondback did.  Diamondback favored their stock stem spacers, while we chose to take those out and use the Aeria's pad/extension risers to get our desired position.  We felt it made for a bit cleaner front end, and frankly, looks a little cooler, too.


We also chose to swap out the round frame-mounted bottle that came with the Andean for an Elite Chrono bottle, which is a bit smaller, but makes for a tidy setup that is easier to get out of the cage.  As an added bonus, it matches the color scheme quite nicely, too.  If I were to use a traditional bottle on this bike, I would opt for a side-load cage to make it easier to get the bottle out.

Finally, we are looking to make for a smoother front end flow of the hydration system to the stem/storage box.  I am using Autodesk Fusion 360 to design a 3D-printed bracket to mount an FC35 on this bike.

With all this said, what does this bike and its gigantic box mean for the bike shops?  Diamondback is one of several brands working to make direct-to-consumer sales work.  I just got an e-mail the other day from Quintana Roo the other day where they were talking up their new packaging.  Talking with some of the bike shops in my area, many have realized that they need to adapt - maybe they aren't getting a new bike sale, but some are starting to offer an "Internet bike" assembly service, with some even supporting having the bike shipped directly to them for final assembly for the customer.  In my opinion, this has the potential to be a fair trade-off - make a little bit of service money without having the inventory/storage costs - although there might be some questions about how to handle any issues that come up, such as "what happens if the bike is damaged?" or "what if parts are missing?"

As Bob Dylan said, the times, they are a changin'.  As more manufacturers move to direct-to-consumer, will the local bike shop die off?  Only time will tell, but I think your LBS is safe for now, if they are willing to evolve with the marketplace.

Thursday, December 22, 2016

2017: A Turning Point in Triathlon Bike Innovation?


This is an interesting time of year for a bike fitter.  As the new year approaches, most of the manufacturers have introduced their new bikes.  For me, this means a lot of data entry as I gather all the geometry information on all the bikes available from Vector Cycle Works, the local bike shops, and online.  I track over 90 brands of bikes that are currently in production.  I get to spend at least a little time looking at every bike out there, and sometimes the details of a certain bike grab my attention.  Sometimes, I see trends.

The 2017 triathlon bike introductions have brought some pretty interesting changes, with some radical-looking designs coming out around the time of the Ironman World Championship in Kona.  The most radical of these are the Diamondback Andean and Cervelo P5X.  These look like something Batman would ride.

In the triathlon world, it has become hard to separate the concept of "the best bike" from "the most aerodynamic" bike.  Aerodynamic efficiency rules the triathlon bike courses of the world and engineers strive to find ways to save every possible watt.  Computational Fluid Dynamics (CFD) and wind tunnels are an integral part of bike design today.  This is also a part of why these bikes command some pretty hefty price tags.

In my opinion, the triathlon bike industry has hit a point of diminishing returns.  I call it "peak aero."  The trend with triathlon bike design over the last few years has been all about aerodynamic performance, with manufacturers introducing their new high-end models with increasing price tags and white papers desperately trying to demonstrate why this bike is so much faster than the others.

Problem is, aerodynamics is a cruel science.  There are so many factors involved in what makes something aerodynamic, how it is measured, and how wind tunnel data compares to real world information.  Two bikes tested in the same wind tunnel on different days can have different results due to atmospheric conditions.  The same bike in different wind tunnels can have different results.  Testing with or without a rider, pedaling or not pedaling, introduces even more confusion.  It's hard for anybody to present a good apples-to-apples comparison of how their new bike is faster than anything else out there.  It's not anybody's fault, but it's hard to trust the white papers.

We're at a point of diminishing returns.  I'm certainly no aerodynamics expert, but when you look at the bikes on the market today, for the most part, we're settling in on some very similar concepts across all models.  Cables runs are clean, front ends are tidy, and tube shapes are similar.  Much of what was introduced on the superbikes of 3 years ago has trickled down to even the most affordable models in the lineup.

As bikes leave the factory, they are all very good nowadays.  I feel that there is a lot of bang for the buck in the sub $3,000 triathlon bike market - bikes like the Felt IA16, Cervelo P2, and many others get a ton of trickle-down technology from their more expensive stablemates.  In my mind, it makes it hard to justify the more expensive bikes.  How much does one spend for each watt saved over the more affordable model?

This is good for the consumer, but the manufacturers (and specifically their marketing departments) have a challenge: the bike does not race by itself.  The bike is one part of a system, and as it turns out, is a relatively small part.  Throw a big blob of meat and bones (i.e., a human body) on top of it, and the bike is only about 20% of the system's total frontal area, at most.  Put that human body in a bad aerodynamic position, and it's even worse.  As a bike fitter, I can help you get more aerodynamic and we can even go to the wind tunnel, but in all honesty, comfort is going to trump aerodynamics (although you might be surprised just how aero you can get while being comfortable).  Throw on the nutrition people need for training and racing, and we are a long way away from that that thing of aerodynamic beauty that left the factory.

This is where I see a shift happening.  Bicycle manufacturers need to tout the other features of the bikes.  The shift has started to happen, with an emphasis on a few things:

  • Non-traditional designs
  • Integrated storage
  • Disc Brakes

Non-Traditional Designs

Looking at the P5X, you'll notice something is missing.  A seat tube.  And chain stays.  The classic "double diamond" design is being challenged again - Dimond, TriRig, Ventum, Falco, Reap, and others are challenging the traditional design.  Many of these have had a parallel design from the past - what's old is new again.

The early Dimond prototypes were based on the Zipp 2001 frame from the early 90's.  The TriRig Omni and Ventum One look similar to the Lotus 108, also from the early 90's.  The idea is that if you can remove unnecessary parts, you can reduce drag.  Some folks think they're ugly.  I think they're beautiful in their own way.

Integrated Storage

Integrated on-the-bike storage is a fun one.  If you look at the P5X and Andean, they have been very clever in how they've integrated storage.  Cervelo put out a white paper for the P5X.  I haven't seen it, and I don't believe most of us can.  Dan Empfield did, so his write-up on it will tell you more than I can.  It appears that the P5X will save the average rider maybe a minute over the P5 on an Ironman course.  How much is that worth to you?

The P5X and Andean aren't the only ones who have jumped on the integrated storage bandwagon.  The new Dimond Marquise has 3 storage compartments.  The Ventum One has a 1,4 liter water bottle integrated into the top tube.

Of course, none of this is totally new - Trek has had their integrated rear storage solution on the Speed Concept for a few years now.  Quintana Roo has their similar QBox on their PR series of bikes.  Many bikes are including top-tube bosses to mount a bento box like the Profile Design ATTK behind the stem, helping to improve airflow through that area.  The Scott Plasma Premium has a nicely integrated between-the-arms (BTA) drink system.  Ceepo offers their Viper-R with storage up front, on the top tube, and in the back.  These are just a few examples.

Disc Brakes

There is one other big thing to point out on the Andean and P5X: disc brakes.  While disc brake technology is pretty much the standard in the mountain bike world, it is only now catching on in road cycling.  The aerodynamics of the disc itself have been a challenge for triathlon bike designers, and part of the reason for the relatively slow adoption.  So far, I am only aware of 3 tri bikes with disc brakes - the P5X, Andean, and the Parlee TTiR.  Over the next 2-3 years, I think we'll see a big shift in braking systems.  The wheel manufacturers are all over this and the products are coming.

I think we're starting to see a shift in triathlon bikes that will start to gain some momentum.  Marketing departments will be looking to find ways to quantify things beyond aerodynamics.  We'll start to see more integrated storage, more disc brakes, and maybe more attention to other factors like how the bike rides, handles, and brakes.  If we can start quantifying these things, we'll see a lot of innovation that will benefit us as consumers.

While late 2016 has brought a lot of big bike announcements, what is interesting to me are the big players that haven't said anything lately - Trek, Specialized, Cannondale, and many others have been fairly quiet.  Is this the calm before the storm?

Thursday, September 8, 2016

New Products Coming Out

As we head into the end of summer in the Northern Hemisphere, we also reach that time of year where some exciting new cycling products start coming out.  Manufacturers are starting to reveal their new stuff for 2017 at some of the big trade shows and events - Eurobike just wrapped up, Interbike is coming up soon, and Kona is often a good opportunity to introduce some new triathlon gear.

Here are a few things that are being introduced that we should be excited about:

Argon 18 is bringing the wind tunnel to your next ride.  The optional body positioning sensors are intriguing.

FSA throws their hat in the electronic shifting ring.  The most interesting aspect of this is the app available to fine-tune your gearing and record your habits.

Wheels are evolving, due to some trends in tire widths, tubeless compatibility, and the increasing availability of disc brakes for road applications.  Lots of new stuff for both on or off-road:

We're seeing some big updates in the power meter world, one of my favorite topics.  I'm hoping to write in some more detail on these soon.  For now:

Winter trainer season is almost here, and some really good stuff is coming out to make it a bit more interesting (I'll be writing more about these soon, too):

While not a new product introduction, the UCI is dropping the 3:1 rule for bike design.  There are a lot of tri bikes that do not conform to the UCI rules out already, but this could open up some doors.

Monday, April 4, 2016

Can't Find Anything to Wear?

Men's Red Dragon Cycling Jersey

 If you've been digging through the closet and can't find anything to wear, consider getting some Vector Cycle Works gear!

All Vector Cycle Works clothing is made by Virklon, a Spanish company specializing in cycling, triathlon, and running clothing.  They have a wide variety of clothes including cycling jerseys and shorts for men, women, and kids, aero triathlon/time trial suits for men and women, kids' triathlon suits, T-shirts, hoodies, and much more.

Women's Blue Dragon Aero Tri Suit
I love the aero triathlon pieces, as they are not only comfortable and potentially fast, but they also cover your shoulders and upper arms from the sun.

With Virklon's help, I've designed 4 series of clothing:

  • Urban Weaponry
  • Red Dragon
  • Blue Dragon
  • Green Dragon
Each series currently has 31 different pieces of clothing, and more are on the way.  I hope to work on a new series or two this year - it's just a lot of fun designing!  You will also find a couple of one-off kids' pieces I made for my daughters for Christmas to match their bikes.

Kid's Urban Camo Tri Suit

If you're interested in checking out the entire collection, you can go to www.virklon.com and enter vector-cycle-works in the teamsAREA team code field on the lower left corner of the home page.

All pricing is in Euros, but when you do the math, you'll find that the prices are really reasonable, especially for good-quality custom stuff like this.  Although these are my designs, you are dealing directly with Virklon and I don't charge any extra for the clothes.  

Shipping is also reasonable - each order is about $10.  It will take about a month to get your order - they will schedule it for production about 3 weeks out, and then it usually takes a week or so to get through Europe, U.S. customs, and to your door.

Of course, you don't have to buy Vector Cycle Works kit if you don't want - you can always design your own!  Virklon makes having a custom one-of-a-kind kit easy to do - there are no minimum orders, design fees, or group order requirements.  You just need some vector image skills.  I can certainly help out, if you'd like.

Virklon has been a pleasure to work with, and I am proud to offer Vector Cycle Works clothing.  I'd be even more proud to see you wearing it!


Men's Green Dragon Long Sleeve Cycling Jersey

Wednesday, January 27, 2016

Visiting the ARC Wind Tunnel


Today was a fun day - the Auto Research Center (ARC) hosted their "Bike Fitter Appreciation Day" at their wind tunnel in Indianapolis.  Wind tunnel testing for cyclists is a relatively new adventure for them, and they had this event to help spread the word.  I am really grateful to have this opportunity, and it was a really cool experience.  A big "thank you" to Tim Jennings and the rest of the ARC crew for inviting us.  Being a cycling nerd and a motorsports dork, I totally geeked out.

Getting Brent's bike ready for his run.
The black table is specifically installed for cycling tests.
The event started at 8:00 AM.  I was the first one there and the only guest there for about an hour before another fitter showed up.  So, I had a lot of time to talk to the staff, hang out in the tunnel, and ask annoying questions about every detail of the tunnel.  They showed me how they configure and calibrate everything.  Another fitter, Brent Emery from Milwaukee, was scheduled for 9:00 AM.  After some time getting his bike set up, we got to watch him do a run.  Brent happens to have won a silver medal in the team pursuit in the 1984 Summer Olympics.

The wind tunnel is pretty cool.  It was originally designed for racing and automotive purposes.  When not configured for bikes, they can test 1/2 scale cars and 1/4 scale semis with a rolling floor.  For cycling, they go 30 mph, but for race cars, up to 118 mph.  It uses a 451 HP electric motor, and to quote one of the technicians, they're "responsible for most of the blackouts in the immediate area."

For cycling purposes, the wind tunnel is set up with the black table, as shown in the pictures.  The rolling floor is not used, and the tunnel is calibrated with the table in place, so that is basically "zero."  The table is equipped with 6-axis sensors to measure several parameters.  For cycling purposes, we're mostly concerned about the following terms:

Drag - The force opposite the motion of an object.  We tend to think of this as a bad thing, and a bike/rider's drag is expressed as CdA - the drag area.  We can also think of this as how many watts we need to go forward.  A big person will require more wattage than a small person to overcome their larger CdA.  The ARC wind tunnel is accurate to within .25 watts.  The main objective of wind tunnel time is to find ways to reduce our CdA so we can go faster with the same power output.

Yaw - The angle at which the wind hits the cyclist.  Zero degrees of yaw is wind coming straight on.  This is what you would experience riding on a completely windless day.  Most cyclists don't get perfectly windless conditions, and it is common to experience 15+ degrees of yaw at normal riding speeds.  The drag on a bike and rider will vary based on the yaw angle.  The ARC table can emulate up to 30 degrees of yaw.

The ARC table has two mounts that replace the skewers, and rollers to spin the tires.  They will typically spin the tires during a test, and usually discourage riders from pedaling because the body movement makes it difficult to get consistent measurements.

A peek inside the control room.
Tim also gave me a tour of most of rest of the ARC facility, although the doors to the 7-post shaker rig and their drivetrain dyno were closed, meaning something secret was going on in there.  I did get to see the inner workings of the tunnel itself including the motor, cooling for the actual floor of the tunnel (the downforce of race cars will create a lot of heat on the rolling belt and the supporting structure and instrumentation), and the stuff to control humidity.

I also got to see their rapid prototyping room.  They have three 3D printers, and they actually had a few interesting parts looking around, mostly parts used to mount a race car or semi model and control it in the tunnel.  The race car models are mounted to a device called a "sting", which hangs down from above the tunnel.  The sting includes instrumentation and motor controls to allow them to do stuff like emulate braking or turning to see how those changes in angles affect the aerodynamics - downforce, drag, etc.

This was really a great experience, and it's nice to have such a facility nearby.  Wind tunnel time is not cheap, but if it is something you are interested in, drop me a note at travis@vectorcycleworks.com and we can see about doing a session.  In the meantime, you can learn more about ARC here:


Thank you again to Tim and the rest of the crew at ARC for a great learning experience!